
Settings Page
The Settings section in CORIOLIX provides administrative controls for system configuration, data management, user accounts, and maintenance. The Settings menu contains four separate configuration areas, each managing different aspects of the CORIOLIX system.
Settings Menu Structure
From the CORIOLIX navigation menu, click Settings to access a dropdown with four administrative configuration options:
- Flowthrough Configuration - Manage valve operating parameters for flowthrough sampling systems
- Data Management - Control data logging, retention policies, and real-time transmission settings
- Account Management - Manage user accounts, permissions, and access levels
- System Management - Refresh sytem configuration
Note: All Settings sections are restricted to support users only. Non-support users will see read-only views where available. The Account Management section is limited to administrators only.
Flowthrough Configuration
The Flowthrough Configuration page manages automated valve switching systems used for controlled fluid sampling and filtering.
Overview
Flowthrough systems use automated valves to switch between different fluid sources or filter configurations on a schedule. Each valve configuration defines:
- Which sensor/valve equipment is being controlled
- Open and closed durations (how long the valve stays in each position)
- What material is being sampled during each state (e.g., ambient seawater, filtered water, calibration fluid)
- Transition time required for the valve to switch positions
Accessing Flowthrough Configuration
- From the main navigation menu, click Settings → Flowthrough Configuration
- The page displays a table of all configured valves
- Depending on user permissions, Edit buttons may appear to manage configurations
Viewing Valve Configurations
The table displays all active valve configurations with the following columns:
| Column | Description |
|---|---|
| Valve ID | Unique identifier for the valve/sensor |
| Open/Close Transition Time | Time (in seconds) required for the valve to switch between open and closed states |
| Open Content | What material is being sampled when the valve is open (e.g., ambient seawater, filtered) |
| Open Duration | How long (in minutes) the valve remains open before closing |
| Closed Content | What material is being sampled/processed when the valve is closed (e.g., maintenance, calibration) |
| Closed Duration | How long (in minutes) the valve remains closed before opening |
Managing Valve Configurations
Adding a New Valve Configuration
- Click Add New Valve Configuration at the top of the page
- Fill in the valve details:
- Select the valve/sensor ID from the list
- Enter transition time (seconds required to open/close)
- Select open content type
- Enter open duration (minutes)
- Select closed content type
- Enter closed duration (minutes)
- Click Save to apply the configuration
Editing an Existing Valve Configuration
- Click the Edit button next to the valve configuration
- Modify the desired parameters
- Click Save to update
Deleting a Valve Configuration
- Click the Delete button next to the configuration (if available)
- Confirm the deletion
Best Practices
- Timing: Ensure total cycle time (open + closed + transition time) aligns with your sampling objectives
- Content Labels: Use clear, consistent naming for open/closed content types
- Testing: Test new configurations with the system in a safe state before deploying during data collection
- Documentation: Document the reason for configuration changes for audit purposes
Data Management
The Data Management page in the Settings menu controls CORIOLIX data logging behavior, real-time transmission, and data retention policies.
Overview
Data Management settings apply to CORIOLIX instances on both the ship and shore systems. They control:
- System-wide notifications and messages
- Real-time data transmission between ship and shore
- Data logging modes and privacy levels
- How long data is retained in different formats (raw files, backups, online database)
Accessing Data Management
- From the main navigation menu, click Settings → Data Management
- The page shows current settings in a read-only view
- Contact an Admin user if any settings need to be chamged.
General Settings
Message to Display
A system-wide message shown to all CORIOLIX users.
- Field: Text input (maximum 200 characters)
- Use Case: Display cruise-specific information, warnings, or scheduled maintenance notices
- Example: "Scheduled maintenance on Feb 15 - limited data access expected"
Message Severity
Indicates the importance level of the displayed message.
- Range: 1 (Low) to 3 (High)
- Impact: Higher severity messages may be highlighted more prominently in the interface
- Recommended: 1 for routine notices, 2-3 for urgent matters
Data Logging Settings
Data Privacy Level
Controls the classification level for collected data and determines who can access it.
- Field: Dropdown selection
- Options: Vary by organization's data governance policies
- Recommendation: Set based on cruise requirements and institutional policies
- Examples: Public, Research (limited sharing), Private (ship only)
Send Real-time Data from Ship to Shore
Enables or disables the transmission of real-time observations from the ship to the shore station.
- Field: Boolean toggle (True/False)
- Default: True (enabled)
- When to Disable: Limited connectivity, expensive bandwidth, or testing scenarios
- Impact:
- When True (enabled): Data transmits as collected; shore station receives real-time updates
- When False (disabled): Data remains on ship until manual transfer
Logging Mode
Determines where CORIOLIX archives live measurement data and which storage destinations are used.
Options:
- file: Logs data to flat files only
- db: Logs data to database only
- file/db: Logs data to both flat files and database (recommended for full redundancy)
- Other options available depending on system configuration
- Recommended: file/db (provides backup in both file and database systems)
- Alert Indicator: Color highlighting if setting differs from recommended practice
EEZ Mode
Controls data handling when operating in Exclusive Economic Zone (territorial) waters.
- Field: Toggle (On/Off)
- When to Enable: When vessel is in territorial waters with special data access agreements
- Impact: Applies special handling according to EEZ regulations and data sharing agreements
Custom Bin Interval
Sets the time interval (in seconds) for binning/averaging raw sensor data into standard intervals.
- Range: 10 to 86,400 seconds
- Examples:
- 10 seconds: High-resolution binning for detailed analysis
- 60 seconds: Standard one-minute intervals (most common)
- 300 seconds: Five-minute intervals for reduced data volume
- 86,400 seconds: Daily averaging only
- Use Case: Adjust based on data resolution needs and storage constraints
Data Storage Duration Settings
These settings control automatic data retention and deletion. Data older than the specified retention period is automatically archived or deleted.
Raw Flat Files (Local Archive)
Duration for retaining raw, unprocessed sensor data files on local storage.
- Range: 10 to 1,000 days
- Recommended: 180 days or longer
- Disk Space: Longer retention requires more local storage
- Recovery: Once deleted, raw data cannot be recovered
- Use Case: Balance between data availability and storage limitations
Emergency Backup Raw Files
Duration for maintaining a rolling backup of raw files on the server of first receipt.
- Range: 0 to 1,000 days
- Recommended: 30 to 45 days
- Purpose: Secondary backup in case of transmission or processing errors
- Set to 0: Disables backups (saves storage but reduces redundancy)
- Critical Deployments: Keep enabled for high-risk or long-duration cruises
Online Data (Database Contents)
Duration for retaining processed data in the CORIOLIX database accessible via web interface.
- Range: 30 to 1,000 days
- Recommended: 180 days
- Special Value: Set to 1,000 to keep all data indefinitely
- Database Impact: Longer retention increases database size; may affect query speed
- Data Access: Older data can still be accessed through raw file archives
Making Changes to Data Management Settings
- Click the Edit button (admin users only)
- Modify desired fields:
- Fill in text fields as needed
- Select options from dropdown menus
- Enter numeric values within specified ranges
- Toggle on/off switches
- Review your changes
- Click Submit to save immediately to both ship and shore systems
- Click Cancel to discard and return to read-only view
Important: Changes take effect immediately across all CORIOLIX instances.
Data Management Best Practices
- Retention Balance: Keep sufficient raw file retention for re-processing but manage storage costs
- Privacy Compliance: Align privacy level with cruise requirements and institutional policies
- Backup Strategy: Enable emergency backups unless storage is severely constrained
- Real-time Transmission: Disable only when connectivity/bandwidth issues require it
- Change Documentation: Record reason and date of setting changes for audit trails
- Testing: Test modifications in a non-critical system first if possible
Account Management
The Account Management page provides information on creating and managing CORIOLIX user accounts, including restricted content, user scope, alerts, and administrative controls.
At present, most of the CORIOLIX web user interface is available for unauthenticated anonymous users. However, some core functionality is restricted to named local users who must first register for an account, then login to gain access to the restricted content.
Restricted Content
Restricted content under each CORIOLIX navigation heading include:
- Cruise Charts - logged in users may save custom user drawn routes
- Sensor Plots - there are no restricted items under this heading
- Status - there are no restricted items under this heading
Sensors
- Add/Modify - add new sensors or make edits to sensor configurations
- Sensor Logs - view, edit, or download sensor specific logfiles
- Vendors - view or edit sensor vendor metadata
- Data - there are no restricted items under this heading
Documents
- Edit - upload or change document metadata
Cruises
- Add New Cruise - edit cruise level metadata
- Event Log - view, create, or download events & event log
My Account
- My Profile - edit your account settings
- My Alerts - configure custom alerts
-
Change My Password - reset password
-
About - there are no restricted items under this heading
User Scope
Currently, accounts are managed on a per-vessel basis. That means accounts are not synchronized across the various CORIOLIX vessel specific deployments. So, if users want access to multiple CORIOLIX user interfaces, Endeavor and Oceanus for example, a separate account on both systems is needed.
Account information is synchronized between the ship side CORIOLIX installation and the shoreside CORIOLIX installation so users only need one account per vessel. The same login credentials are used for both instances.
First Time Account Creation
Browse to the appropriate CORIOLIX site.
From the navigation options at the top of the page, select: My Account > Create New Account

Complete the User Profile setup form and select the Submit button. Note the email and password used. Use these credentials to access CORIOLIX.
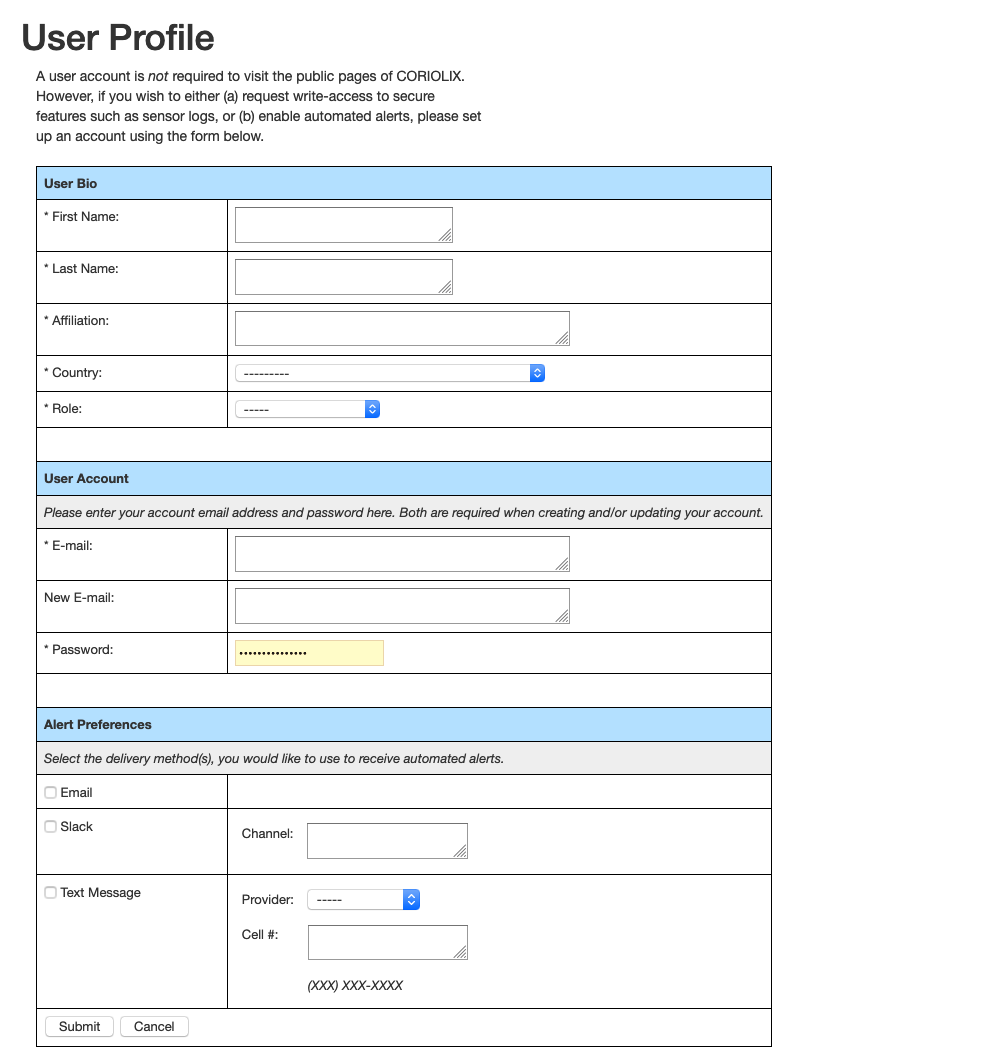
Setting Up User Specific Alerts
From the site navigation options select: My Account > My Alerts
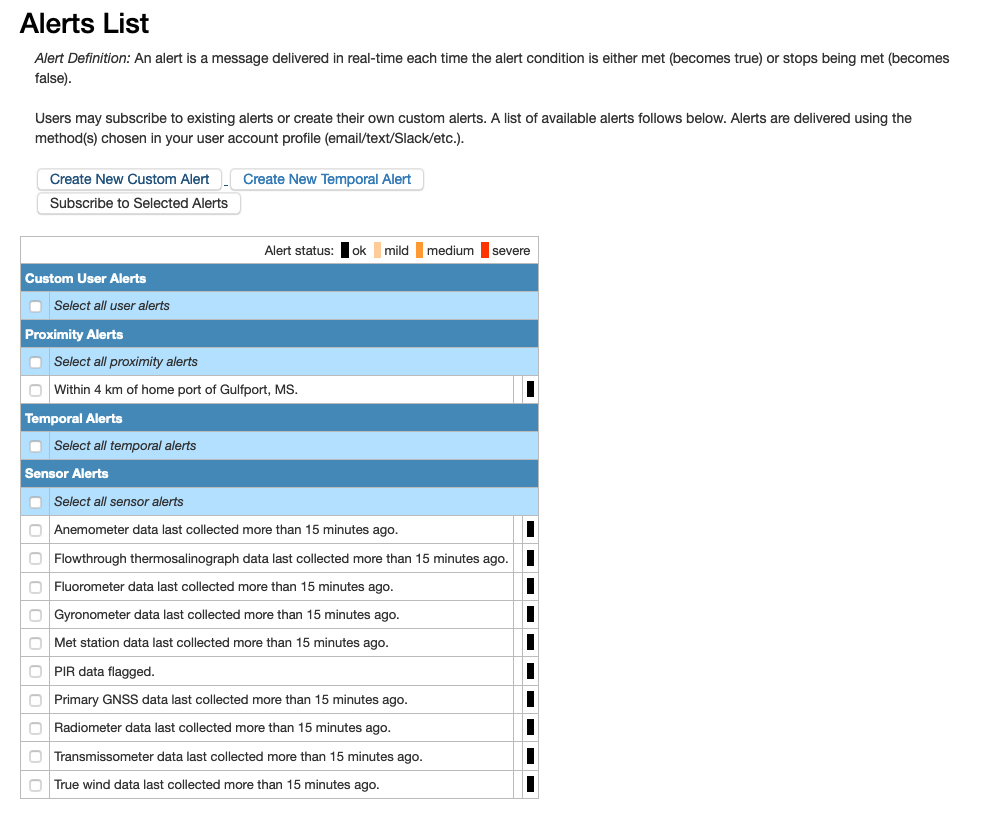
Alert Types
-
Value Alerts - Value alerts work by evaluating sensor parameter value against a threshold condition. The Alert Configuration page has an example of a use case for Value Alerts. Users may combine up to two sensors or sensor parameters per value alert.
-
Proximity Alerts - Proximity alerts evaluate the location of the vessel against geographic points of interest (stations, ports, etc.).
- Temporal Alerts - Temporal alerts evaluate the time now against a datetime parameter for a sensor (e.g. calibration date, warranty expiration date, schedule maintenance data, etc.) to monitor. Users may set an additional parameter, offset, to receive advance notice of a pending event.
- Sensor Alerts - These alerts serve as status updates for sensors. They are generated automatically when a new sensor is added and CORIOLIX is refreshed.
Place a check next to any alerts (in the alert table) that you would like to receive. Existing alerts may be edited using the "Edit" button. New alerts may be created by using one of the "Create New" buttons.
When your selections have been made, click the "Subscribe to Selected Alerts" button to update your subscriptions.
Administrative Account Management
The Account Management page allows administrators to manage CORIOLIX user accounts, assign permission levels, and control data access privileges.
Note: This page is only accessible to CORIOLIX administrators. Note: These settings apply to CORIOLIX instances on both the ship and shore.
Accessing Administrative Account Management
- From the main navigation menu, click Settings → Account Management
- The page shows two tables: Active Accounts and Inactive Accounts
- Account viewing and modifications require administrative privileges
Active Accounts Table
Displays all currently active user accounts with sortable columns:
| Column | Description |
|---|---|
| First Name | User's first name |
| Last Name | User's last name |
| User's email address | |
| Affiliation | Organization or institution |
| Last Login | Most recent login date |
| Role | User's assigned role |
| Permission Level | Access level to system features |
| Designated Contact | Whether user is designated data contact |
| Data Access Level | Access to private/sensitive data |
| Allow Login | Whether account is enabled for log-in |
Managing User Accounts
Permission Levels
Four permission levels control feature access:
- Public: Limited access, suitable for data consumers
- Science: Full data access, research-oriented permissions
- Support: Technical support staff permissions
- Administrator: Full system access and management capabilities
Designated Contact
Check the Designated Contact checkbox to mark a user as the primary data contact. The contact information for these users are included with data delivered to long-term archives.
Data Access Level
Check the Private Data Access checkbox to grant a user access to:
- Confidential cruise data before public release
Allow Login
Check the Allow Login checkbox to enable an account for user sign-in. Uncheck to disable access without deleting the account.
Making Changes
- Modify the desired account settings using radio buttons and checkboxes
- Review your changes carefully
- Click Submit to apply changes to both ship and shore systems
- Click Cancel to discard changes
- Account changes take effect immediately.
Inactive Accounts Table
Displays user accounts that have been disabled (Allow Login unchecked). These can be reactivated by checking the Allow Login checkbox.
Administrative Account Management Best Practices
- Principle of Least Privilege: Assign the minimum permission level needed for each user's role
- Designated Contacts: Maintain at least 2-3 designated data contacts
- Regular Review: Periodically review active accounts and remove departed team members
- Access Control: Use data access restrictions for sensitive pre-publication data
- Documentation: Record account modifications and the reason for changes
- Permission Levels: Use Science level for researchers, Support for IT staff, Admin only as needed
- Shared Accounts: Disallow the use of shared accounts (e.g. techs@myship.edu) to ensure accountability
System Management
The System Management page provides access to CORIOLIX system refresh operations.
Important Note: System Management actions ONLY affect the local CORIOLIX instance (either ship OR shore, not both).
Accessing System Management
- From the main navigation menu, click Settings → System Management
- Only user with support roles can view this section
- A single action button is displayed: Refresh CORIOLIX
Refresh CORIOLIX Operation
The Refresh operation updates all CORIOLIX configurations and deploys recent changes to the active system.
When to Use Refresh
A CORIOLIX refresh is recommended after any of the following:
- A sensor is added, edited, removed, enabled, or disabled
- A parameter is added, edited, or removed
- The database schema is modified (tables added, modified, or removed)
- Major configuration files are updated
- You want to sync changes from configuration tools like OpenRVDAS or ERDDAP
Starting a Refresh
- Click the Refresh CORIOLIX button
- The refresh process begins automatically and progresses through multiple steps
- A progress indicator shows: "Step X of 9..."
- Typical duration: 20 seconds
- The page displays output for each step as it completes
Refresh Steps
The refresh operation performs these steps sequentially:
- Create/Modify Dynamic Data Tables - Updates database table structures based on current configuration
- Update OpenRVDAS Configurations - Regenerates YAML files for the data acquisition system
- Update Sensor Alert Configurations - Applies current alert rules to sensors
- Update ERDDAP Datasets - Refreshes data exposure to external data discovery services
- Update pgAgent Jobs - Schedules automated tasks (rolling tables, alerts, maintenance)
- Update Table Triggers - Implements database triggers for real-time processing
- Update Primary Parameter Configurations - Updates which parameters should be designated as primary
- Implement New OpenRVDAS Configurations - Deploys updated acquisition configurations
- Update and Restart ERDDAP - Restarts external data discovery services
Monitoring the Refresh
- Watch the step counter as the refresh progresses
- Monitor the output panel for error messages or warnings
- Once Step 9 completes, the refresh is finished
- The button returns to Refresh CORIOLIX, indicating readiness for another refresh if needed
Disabling Refresh for Non-Support Users
The button shows as Refresh CORIOLIX (disabled) for users without adequate permissions.
System Management Best Practices
- Schedule Refreshes Strategically: Perform refreshes during low-traffic periods to minimize user impact
- Inform Users: Inform active users of potential downtime
- Back Up Configuration: Keep backup copies of critical configuration files before major changes
- Test Changes: Test sensor or parameter changes in a non-critical system before deploying to production
- Document Changes: Record what configuration changes triggered the refresh
- Monitor Output: Review the refresh output for warnings even if it completes successfully
- Plan for Downtime: Some ERDDAP operations may briefly affect data service availability
Related Documentation
- Admin Getting Started - Administrative user overview
- Data Access - Accessing and downloading CORIOLIX data
- Logs & Monitoring - System logs and health monitoring
- API Endpoints - Integration and external data access